Setting Up Docker and Buildbot
One of the newest players in the field of increasing server density and utilization is a piece of software called Docker. The idea is solid. Rather than automate the creation and management of resource-heavy virtual machines, Docker automates the management of lightweight Linux Containers (broken link) (LXC containers), which allow for process and resource isolation backed by kernel guarantees on a single system. This means you have one system kernel, instead of dozens, and you don't have to waste resources on duplicated pieces of code like system libraries, daemons, and other things that every server will always load into memory.
The ability to create a uniform and repeatable software environment inside of a container is worthy of attention, since it directly relates to getting both development and continuous integration environments running cleanly across a variety of systems.
It's a problem I'm having right now: I need a continuous integration setup that can poll the master branch of a git repository and trigger a build on Windows, OS X, Linux, and Android. I have limited physical resources, but at least one multicore machine with 8GB of RAM running a 64-bit host OS.
Getting Started with Docker
Without further ado, here's how I got going with Docker, after getting a clean 64-bit Ubuntu 12.04.3 system installed inside of VirtualBox.
Purge the old kernel (3.2):
sudo apt-get purge linux-image-* linux-headers-*Install the new kernel (3.8):
sudo apt-get update
sudo apt-get install linux-image-generic-lts-raring linux-headers-generic-lts-raring
sudo reboot
Install Docker (instructions from here (broken link)):
# Add the Docker repository key to your local keychain
# using apt-key finger you can check the fingerprint matches 36A1 D786 9245 C895 0F96 6E92 D857 6A8B A88D 21E9
sudo sh -c "curl https://get.docker.io/gpg | apt-key add -"

# Add the Docker repository to your apt sources list.
sudo sh -c "echo deb https://get.docker.io/ubuntu docker main > /etc/apt/sources.list.d/docker.list"

# Update your sources
sudo apt-get update

# Install, you will see another warning that the package cannot be authenticated. Confirm install.
sudo apt-get install lxc-docker
That last command spits out an interesting list of dependencies, which I'm capturing here in case I need to look up the associated manpages later:
$ sudo apt-get install lxc-docker
Reading package lists... Done
Building dependency tree
Reading state information... Done
The following extra packages will be installed:
  aufs-tools bridge-utils cgroup-lite cloud-utils debootstrap euca2ools libapparmor1 libyaml-0-2 lxc lxc-docker-0.6.1
  python-boto python-m2crypto python-paramiko python-yaml
Suggested packages:
  btrfs-tools lvm2 qemu-user-static
The following NEW packages will be installed:
  aufs-tools bridge-utils cgroup-lite cloud-utils debootstrap euca2ools libapparmor1 libyaml-0-2 lxc lxc-docker
  lxc-docker-0.6.1 python-boto python-m2crypto python-paramiko python-yaml
0 upgraded, 15 newly installed, 0 to remove and 0 not upgraded.
Need to get 3,817 kB of archives.
After this operation, 20.6 MB of additional disk space will be used.
Do you want to continue [Y/n]?
With Docker installed, but before running the "Hello World" Docker example, I took a snapshot of the virtual machine. Now that I think about it, though, that's the last snapshot I'll need, since Docker is itself a snapshottable container organizer.
$ sudo docker run -i -t ubuntu /bin/bash
[sudo] password for nuket:
Unable to find image 'ubuntu' (tag: latest) locally
Pulling repository ubuntu
8dbd9e392a96: Download complete
b750fe79269d: Download complete
27cf78414709: Download complete
WARNING: Docker detected local DNS server on resolv.conf. Using default external servers: [8.8.8.8 8.8.4.4]
WARNING: IPv4 forwarding is disabled.
root@e8c30f41da03:/#
No More sudo
I got a little tired of typing sudo in front of everything, so used the instructions here (broken link) to add a docker group to the system, and restart the daemon with those credentials.
# Add the docker group
sudo groupadd docker

# Add the ubuntu user to the docker group
# You may have to logout and log back in again for
# this to take effect
sudo gpasswd -a ubuntu docker

# Restart the docker daemon
sudo service docker restart
Then I log out and log back into my desktop session, to gain the group permissions.
Getting Buildbot Installed
Someone beat me to it and uploaded a Dockerfile describing both a buildbot-master and buildbot-slave
configuration:
Found 6 results matching your query ("buildbot")
NAME                             DESCRIPTION
mzdaniel/buildbot
mdaniel/buildbot
ehazlett/buildbot-master         Buildbot Master See full description for available environment variables to customize.
ehazlett/buildbot-slave
ehazlett/buildbot                Standalone buildbot with master/slave.  See full description for available environment variables.
mzdaniel/buildbot-tutorial
Pull buildbot-master
docker pull ehazlett/buildbot-masterAccording to the Docker Index entry for buildbot-master (broken link), there are a
handful of environment variables available to be passed into docker run. (This is a bit of a kicker for me, that at the moment you have to pass these environment variables in via the command line, but I'm guessing they'll fix that to read them in via a file at some point.)
CONFIG_URL: URL to buildbot config (overrides all other vars)
PROJECT_NAME: Name of project (shown in UI)
PROJECT_URL: URL of project (shown in UI)
REPO_PATH: Path to code repo (buildbot watches -- i.e. git://github.com:ehazlett/shipyard.git)
TEST_CMD: Command to run as test
BUILDBOT_USER: Buildbot username (UI)
BUILDBOT_PASS: Buildbot password (UI)
BUILDSLAVE_USER: Buildbot slave username
BUILDSLAVE_PASS: Buildbot slave password
Start buildbot-master
The documentation isn't super-clear on how to pass these multiple environment variables into the docker container, but it looks something like this:
$ docker run -e="foo=bar" -e="bar=baz" -i -t ubuntu /bin/bash
WARNING: Docker detected local DNS server on resolv.conf. Using default external servers: [8.8.8.8 8.8.4.4]
root@1f357c1e17b4:/# echo $foo
bar
root@1f357c1e17b4:/# echo $bar
baz
For the time being, I'll just run the container with its default parameters.
CID=$(docker run -d ehazlett/buildbot-master)But I'm also curious as to how I'm supposed to communicate with it. So I inspect the docker configuration for the buildbot-master:
$ docker inspect ehazlett/buildbot-master
[{
    "id": "65b30cc442ab8046c9e8f91b27bcf389a48f02891f9744749b24d1931e14e171",
    "parent": "38a1aee6da342cecdc0cdf476c501b2aa6cd2f8991fd86d06dcd749ca4a1755f",
    "created": "2013-07-13T19:03:23.199576548-04:00",
    "container": "94e56633cecd6a741a1a38f6295527e03486e45d6c95ffab51a3460a9cf08062",
    "container_config": {
        "Hostname": "f4e032c07c6c",
        "User": "",
        "Memory": 0,
        "MemorySwap": 0,
        "CpuShares": 0,
        "AttachStdin": false,
        "AttachStdout": false,
        "AttachStderr": false,
        "PortSpecs": [
            "9989",
            "8010"
        ],
        "Tty": false,
        "OpenStdin": false,
        "StdinOnce": false,
        "Env": null,
        "Cmd": [
            "/bin/sh",
            "-c",
            "#(nop) CMD [/bin/sh -c /bin/sh -e /usr/local/bin/run]"
        ],
        "Dns": null,
        "Image": "38a1aee6da342cecdc0cdf476c501b2aa6cd2f8991fd86d06dcd749ca4a1755f",
        "Volumes": null,
        "VolumesFrom": "",
        "WorkingDir": "",
        "Entrypoint": null,
        "NetworkDisabled": false,
        "Privileged": false
    },
    "docker_version": "0.4.8",
    "author": "Evan Hazlett \"ejhazlett@gmail.com\"",
    "config": {
        "Hostname": "f4e032c07c6c",
        "User": "",
        "Memory": 0,
        "MemorySwap": 0,
        "CpuShares": 0,
        "AttachStdin": false,
        "AttachStdout": false,
        "AttachStderr": false,
        "PortSpecs": [
            "9989",
            "8010"
        ],
        "Tty": false,
        "OpenStdin": false,
        "StdinOnce": false,
        "Env": null,
        "Cmd": [
            "/bin/sh",
            "-c",
            "/bin/sh -e /usr/local/bin/run"
        ],
        "Dns": null,
        "Image": "38a1aee6da342cecdc0cdf476c501b2aa6cd2f8991fd86d06dcd749ca4a1755f",
        "Volumes": null,
        "VolumesFrom": "",
        "WorkingDir": "",
        "Entrypoint": null,
        "NetworkDisabled": false,
        "Privileged": false
    },
    "architecture": "x86_64",
    "Size": 12288
}]
So what happens when you run the container? You have to find out the portmapping of the buildbot ports inside the container to the ports on your host system.
$ docker port $CID 9989
49159
$ docker port $CID 8010
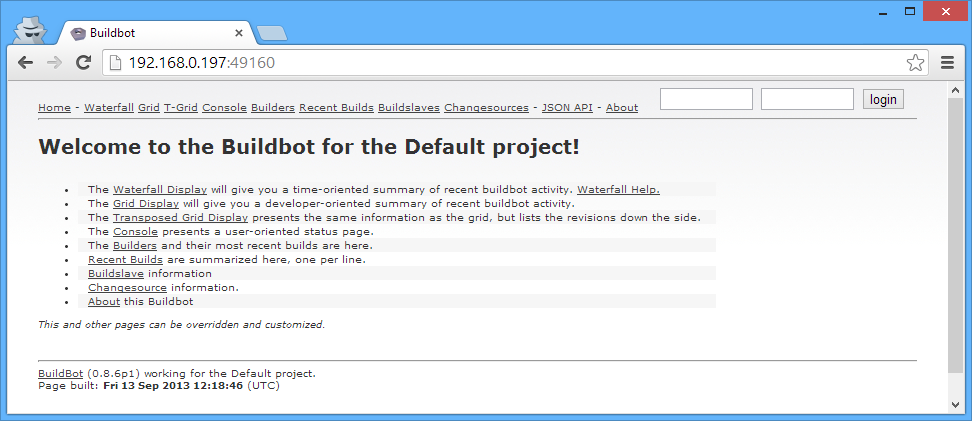
49160Port 9989 is the communications port for the Buildbot systems to talk to one another. Port 8010 is the Buildbot web interface whch you can open in a browser, like so:
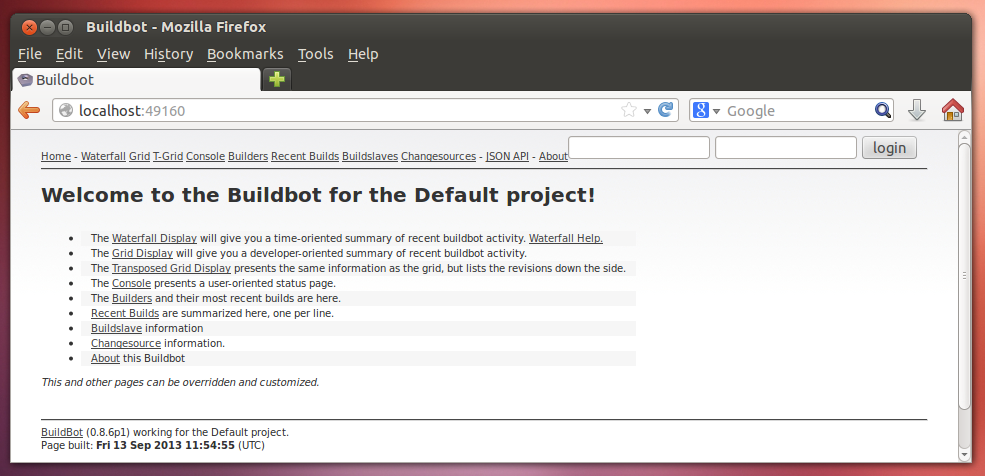
Of course, you can access this from the outside (in the top-most, non-virtual host OS as well):
Docker Subnetwork
It's also not entirely clear from the Docker basic instructions, that Docker also creates an
internal private network that is NATed to the host, so when you run ifconfig on the Docker host,
you'll see:
$ ifconfig
docker0   Link encap:Ethernet  HWaddr 46:58:e6:a1:76:97
          inet addr:172.17.42.1  Bcast:0.0.0.0  Mask:255.255.0.0
          inet6 addr: fe80::7cab:71ff:fed7:ae28/64 Scope:Link
          UP BROADCAST RUNNING MULTICAST  MTU:1500  Metric:1
          RX packets:139 errors:0 dropped:0 overruns:0 frame:0
          TX packets:121 errors:0 dropped:0 overruns:0 carrier:0
          collisions:0 txqueuelen:0
          RX bytes:30451 (30.4 KB)  TX bytes:16091 (16.0 KB)
And if you've attached to a Docker container, and run ip addr show, you'll see:
# ip addr show
33: eth0:  mtu 1500 qdisc pfifo_fast state UP qlen 1000
    link/ether ba:08:e6:e5:9c:c4 brd ff:ff:ff:ff:ff:ff
    inet 172.17.0.11/16 brd 172.17.255.255 scope global eth0
    inet6 fe80::b808:e6ff:fee5:9cc4/64 scope link
       valid_lft forever preferred_lft forever
Which you'll also see if you run docker inspect $CID, which returns useful runtime information
about the specific container instance:
$ docker inspect bfcd89fa26fb
[{
    "ID": "bfcd89fa26fb2f49e8de658a2b5baee1dd39d71a39e0e43a4924153dcb48d1a6",
    "Created": "2013-09-13T13:48:18.870899235+02:00",
    "Path": "/bin/sh",
    "Args": [
        "-c",
        "/bin/sh -e /usr/local/bin/run"
    ],
    "Config": {
        "Hostname": "bfcd89fa26fb",
        "User": "",
        "Memory": 0,
        "MemorySwap": 0,
        "CpuShares": 0,
        "AttachStdin": false,
        "AttachStdout": false,
        "AttachStderr": false,
        "PortSpecs": [
            "9989",
            "8010"
        ],
        "Tty": false,
        "OpenStdin": false,
        "StdinOnce": false,
        "Env": null,
        "Cmd": [
            "/bin/sh",
            "-c",
            "/bin/sh -e /usr/local/bin/run"
        ],
        "Dns": [
            "8.8.8.8",
            "8.8.4.4"
        ],
        "Image": "ehazlett/buildbot-master",
        "Volumes": null,
        "VolumesFrom": "",
        "WorkingDir": "",
        "Entrypoint": null,
        "NetworkDisabled": false,
        "Privileged": false
    },
    "State": {
        "Running": true,
        "Pid": 4647,
        "ExitCode": 0,
        "StartedAt": "2013-09-13T13:48:19.006892349+02:00",
        "Ghost": false
    },
    "Image": "65b30cc442ab8046c9e8f91b27bcf389a48f02891f9744749b24d1931e14e171",
    "NetworkSettings": {
        "IPAddress": "172.17.0.11",
        "IPPrefixLen": 16,
        "Gateway": "172.17.42.1",
        "Bridge": "docker0",
        "PortMapping": {
            "Tcp": {
                "8010": "49160",
                "9989": "49159"
            },
            "Udp": {}
        }
    },
    "SysInitPath": "/usr/bin/docker",
    "ResolvConfPath": "/var/lib/docker/containers/bfcd89fa26fb2f49e8de658a2b5baee1dd39d71a39e0e43a4924153dcb48d1a6/resolv.conf",
    "Volumes": {},
    "VolumesRW": {}
}]
So now the question is how to get the buildbot-slaves on other VMs to talk to the buildbot-master,
and how to configure the buildbot-master itself. I'm also considering getting an instance of
CoreOS running, as it seems to have a mechanism for handling global configuration within a cluster, which would
be one way to provide master.cfg to the buildbot-master.
Updates to this post to follow.
Update: Easier Overview
The easier way to see your container runtime configurations at a glance is to use the docker ps
command (Duh!). Particularly nice is the port-mapping list in the rightmost column:
$ docker ps
ID                  IMAGE                             COMMAND                CREATED             STATUS              PORTS
c660d37298eb        ubuntu:12.04                      /bin/bash              35 minutes ago      Up 35 minutes
bfcd89fa26fb        ehazlett/buildbot-master:latest   /bin/sh -c /bin/sh -   About an hour ago   Up About an hour    49159->9989, 49160->8010
Update: Configuring the Buildbot Master Itself
You can just jump into the container and edit the master.cfg, like so:
$ docker run -t -i ehazlett/buildbot-master /bin/bash
WARNING: Docker detected local DNS server on resolv.conf. Using default external servers: [8.8.8.8 8.8.4.4]
root@d66069b7441d:/# ls
bin  boot  dev	etc  home  lib	lib64  media  mnt  opt	proc  root  run  sbin  selinux	srv  sys  tmp  usr  var
root@d66069b7441d:/# cd opt
root@d66069b7441d:/opt# ls
buildbot
root@d66069b7441d:/opt# cd buildbot/
root@d66069b7441d:/opt/buildbot# ls
buildbot.tac  master.cfg  master.cfg.sample  public_html  state.sqlite
root@d66069b7441d:/opt/buildbot# ls -l
total 100
-rw-r--r-- 1 root root     1119 Jul 13 14:47 buildbot.tac
-rw------- 1  501 dialout  4560 Jul 13 23:03 master.cfg
-rw------- 1 root root     4472 Jul 13 14:47 master.cfg.sample
drwxr-xr-x 2 root root     4096 Jul 13 14:47 public_html
-rw-r--r-- 1 root root    75776 Jul 13 14:47 state.sqlite
Update: Getting the list of all Containers
It's not entirely intuitive, but each time you docker run an Image, you get a new
Container, and these Containers don't generally show up as you might expect. (I was wondering how the diff command was supposed to work, for instance.)
You have to use the docker ps -a command, to see all of the Container IDs, which you then can
start and stop.
In other words, using docker run image-name creates the new Container. But for subsequent calls,
you should use docker start container-id.
This also clarifies why there's a docker rm and a docker rmi command.
$ docker ps -a
ID                  IMAGE                             COMMAND                CREATED             STATUS              PORTS
d66069b7441d        ehazlett/buildbot-master:latest   /bin/bash              14 minutes ago      Exit 0
8c44c1698e42        ehazlett/buildbot-master:latest   /bin/sh -c /bin/sh -   14 minutes ago      Exit 130
1c49d0ec2776        ehazlett/buildbot-slave:latest    /bin/bash              18 minutes ago      Exit 0
4a12b3e0a58f        ehazlett/buildbot-slave:latest    /bin/bash              18 minutes ago      Exit 0
2338bd47eae3        ehazlett/buildbot-slave:latest    /bin/sh -c /bin/sh -   19 minutes ago      Exit 137
c660d37298eb        ubuntu:12.04                      /bin/bash              About an hour ago   Exit 0
bfcd89fa26fb        ehazlett/buildbot-master:latest   /bin/sh -c /bin/sh -   About an hour ago   Exit 137
9bd43a8ee984        ehazlett/buildbot-master:latest   /bin/sh -c /bin/sh -   About an hour ago   Exit 137
2d632bf97c46        ehazlett/buildbot-master:latest   /bin/sh -c /bin/sh -   About an hour ago   Exit 137
f59c6cb3cf82        ehazlett/buildbot-master:latest   /bin/sh -c /bin/sh -   About an hour ago   Exit 0
1f357c1e17b4        ubuntu:12.04                      /bin/bash              2 hours ago         Exit 0
dac64b71ca23        ubuntu:12.04                      /bin/bash              2 hours ago         Exit 0
b47a0f6330b3        ubuntu:12.04                      /bin/bash              2 hours ago         Exit 0
12058ce13e8d        ubuntu:12.04                      /bin/bash              2 hours ago         Exit 0
246209829817        ubuntu:12.04                      /bin/bash              2 hours ago         Exit 0
668598613a3a        ubuntu:12.04                      /bin/bash              2 hours ago         Exit 0
629bff591109        ubuntu:12.04                      /bin/bash              2 hours ago         Exit 0
0ca50dd5169a        ubuntu:12.04                      /bin/sh -c while tru   3 hours ago         Exit 137
9237ed1a810a        ubuntu:12.04                      /bin/echo hello worl   3 hours ago         Exit 0
e8c30f41da03        ubuntu:12.04                      /bin/bash              3 hours ago         Exit 0

$ docker diff d66069b7441d
A /.bash_history
An easy way to remove unused Docker containers
docker rm `docker ps -a -q`Update: Using cpp to make Dockerfiles uniform
This section could also be called "The horror, the horror". Following the best practices list mentioned here (broken link), I decided
to create a uniform include files to pull into my Dockerfiles, which I then generate using the C
preprocessor (pretty much because it's cheap and available).
So the idea I had was to put common Dockerfile instructions into separate files. I'm guessing the
Docker devs might build an INCLUDE instruction into the Dockerfile syntax at some point. The benefit
to doing this is that you can take advantage of the docker image cache, which stores incremental
versions of your build-images based on the instructions and base-image used to create them. In other
words, you don't have to keep rebuilding the common parts of various Docker images. And you're less
likely to mistype common lines across files, which could be a source of inefficiency.
Dockerfile.ubuntu
FROM ubuntu:12.04
MAINTAINER Max Vilimpoc <email@address.com>

RUN echo "deb http://archive.ubuntu.com/ubuntu precise main universe" > /etc/apt/sources.list
RUN apt-get update
RUN apt-get upgrade -y
Dockerfile.run
ADD run.sh /opt/run.sh
CMD ["/bin/bash", "/opt/run.sh"]
In a clean subdirectory, below where the .ubuntu and .run files are located:
Dockerfile.in
#include "Dockerfile.ubuntu"

RUN apt-get install -y [whatever specific packages I want]

#include "Dockerfile.run"
To create the custom Dockerfile:
cpp -Xpreprocessor -I.. Dockerfile.in -o DockerfileWhich generates something like:
# 1 "Dockerfile.in"
# 1 "<built-in>"
# 1 "<command-line>"
# 1 "Dockerfile.in"
# 1 "../Dockerfile.header" 1
FROM ubuntu:12.04
MAINTAINER Max Vilimpoc <email@address.com>

RUN echo "deb http://archive.ubuntu.com/ubuntu precise main universe" > /etc/apt/sources.list
RUN apt-get update
RUN apt-get upgrade -y
# 2 "Dockerfile.in" 2

RUN apt-get install -y [whatever specific packages I want]

# 1 "../Dockerfile.footer" 1
ADD run.sh /opt/run.sh
CMD ["/bin/bash", "/opt/run.sh"]
# 5 "Dockerfile.in" 2
Then just docker build . like usual.
Update: Now with github!
I've created a repository on github to play
around with includable Dockerfiles.
The github repository currently has a few images in it, which are related to one another in a tree that looks like this:
.
├── baselines
│   └── Dockerfile.ubuntu1204
├── build-essentials-4.8
│   ├── Dockerfile.build-essentials-4.8
│   ├── Dockerfile.in
│   ├── qt502linux64-buildslave
│   │   ├── Dockerfile.in
│   │   ├── Dockerfile.qt502linux64
│   │   └── README.md
│   ├── qt511linux64-buildslave
│   │   ├── build.sh
│   │   ├── Dockerfile.in
│   │   ├── Dockerfile.qt511linux64
│   │   └── README.md
│   └── README.md
├── Dockerfile.run
├── packages
│   ├── Dockerfile.add-apt-repository
│   ├── Dockerfile.git
│   ├── Dockerfile.vnc
│   └── Dockerfile.wget
└── README.md
The idea, then is to eliminate redundant text by including Dockerfiles in other Dockerfiles, and to
organize this hierarchically, such that images further down the hierarchy are just combinations of
their parents + some differentiation.
apt-get install package caching using squid-deb-proxy
If you're actively developing Docker images, one thing that slows you down a lot and puts considerable load on Ubuntu's mirror network is the redundant downloading of software packages.
To speed up your builds and save bandwidth, install squid-deb-proxy and squid-deb-proxy-client
on the Docker container host (in my case, the outermost Ubuntu VM):
$ sudo apt-get install -y squid-deb-proxy squid-deb-proxy-clientAnd, make sure you add ppa.launchpad.net (and any other PPA archive sources) to
/etc/squid-deb-proxy/mirror-dstdomain.acl:
# PPAs
ppa.launchpad.net
And restart the proxy:
sudo restart squid-deb-proxyIn your Dockerfile, set the proxy configuration file to point to the default route address (which is where squid-deb-proxy will be running):
RUN /sbin/ip route | awk '/default/ { print "Acquire::http::Proxy \"http://"$3":8000\";" }' > /etc/apt/apt.conf.d/30proxyOnce the caching is set up, you can monitor accesses via the logfiles in /var/log/squid-deb-proxy.
The first time you build an image, the log file has lots of cache misses:
$ sudo cat /var/log/squid-deb-proxy/access.log
1379268373.573      4 127.0.0.1 NONE/400 3534 GET / - NONE/- text/html
1379268375.056      0 127.0.0.1 NONE/400 3556 GET /favicon.ico - NONE/- text/html
1379271050.123    243 172.17.0.13 TCP_MISS/404 645 GET http://archive.ubuntu.com/ubuntu/dists/precise/InRelease - DIRECT/91.189.92.177 text/html
1379271050.166     32 172.17.0.13 TCP_MISS/304 357 GET http://archive.ubuntu.com/ubuntu/dists/precise/Release.gpg - DIRECT/91.189.92.177 -
1379271050.247     78 172.17.0.13 TCP_MISS/304 359 GET http://archive.ubuntu.com/ubuntu/dists/precise/Release - DIRECT/91.189.92.177 -
1379271050.413     28 172.17.0.13 TCP_MISS/304 361 GET http://archive.ubuntu.com/ubuntu/dists/precise/main/binary-amd64/Packages.gz - DIRECT/91.189.92.177 -
1379271056.377   5963 172.17.0.13 TCP_MISS/200 6167466 GET http://archive.ubuntu.com/ubuntu/dists/precise/universe/binary-amd64/Packages.gz - DIRECT/91.189.92.177 application/x-gzip
1379271057.454   1076 172.17.0.13 TCP_MISS/200 1641560 GET http://archive.ubuntu.com/ubuntu/dists/precise/main/binary-i386/Packages.gz - DIRECT/91.189.92.177 application/x-gzip
1379271061.987   4532 172.17.0.13 TCP_MISS/200 6180057 GET http://archive.ubuntu.com/ubuntu/dists/precise/universe/binary-i386/Packages.gz - DIRECT/91.189.92.177 application/x-gzip
1379271062.029     43 172.17.0.13 TCP_MISS/200 4086 GET http://archive.ubuntu.com/ubuntu/dists/precise/main/i18n/Index - DIRECT/91.189.92.177 text/plain
1379271062.066     37 172.17.0.13 TCP_MISS/200 3302 GET http://archive.ubuntu.com/ubuntu/dists/precise/universe/i18n/Index - DIRECT/91.189.92.177 text/plain
1379271062.103     35 172.17.0.13 TCP_MISS/404 663 GET http://archive.ubuntu.com/ubuntu/dists/precise/main/i18n/Translation-en.xz - DIRECT/91.189.92.177 text/html
1379271062.157     52 172.17.0.13 TCP_MISS/404 667 GET http://archive.ubuntu.com/ubuntu/dists/precise/universe/i18n/Translation-en.xz - DIRECT/91.189.92.177 text/html
1379271062.801    643 172.17.0.13 TCP_MISS/200 892983 GET http://archive.ubuntu.com/ubuntu/dists/precise/main/i18n/Translation-en.gz - DIRECT/91.189.92.177 application/x-gzip
1379271066.543   3733 172.17.0.13 TCP_MISS/200 4133268 GET http://archive.ubuntu.com/ubuntu/dists/precise/universe/i18n/Translation-en.gz - DIRECT/91.189.92.177 application/x-gzip
1379271372.404      0 127.0.0.1 NONE/400 3534 GET / - NONE/- text/html
The second time, you'll see a number of hits (TCP_REFRESH_UNMODIFIED), saving you bandwidth and time:
1379271536.034    151 172.17.0.17 TCP_MISS/404 645 GET http://archive.ubuntu.com/ubuntu/dists/precise/InRelease - DIRECT/91.189.92.200 text/html
1379271536.080     34 172.17.0.17 TCP_MISS/304 357 GET http://archive.ubuntu.com/ubuntu/dists/precise/Release.gpg - DIRECT/91.189.92.200 -
1379271536.113     32 172.17.0.17 TCP_MISS/304 359 GET http://archive.ubuntu.com/ubuntu/dists/precise/Release - DIRECT/91.189.92.200 -
1379271536.326     34 172.17.0.17 TCP_MISS/304 361 GET http://archive.ubuntu.com/ubuntu/dists/precise/main/binary-amd64/Packages.gz - DIRECT/91.189.92.200 -
1379271536.748    419 172.17.0.17 TCP_REFRESH_UNMODIFIED/200 6167472 GET http://archive.ubuntu.com/ubuntu/dists/precise/universe/binary-amd64/Packages.gz - DIRECT/91.189.92.200 application/x-gzip
1379271536.993    244 172.17.0.17 TCP_REFRESH_UNMODIFIED/200 1641558 GET http://archive.ubuntu.com/ubuntu/dists/precise/main/binary-i386/Packages.gz - DIRECT/91.189.92.200 application/x-gzip
1379271537.625    632 172.17.0.17 TCP_REFRESH_UNMODIFIED/200 6180063 GET http://archive.ubuntu.com/ubuntu/dists/precise/universe/binary-i386/Packages.gz - DIRECT/91.189.92.200 application/x-gzip
1379271537.700     75 172.17.0.17 TCP_REFRESH_UNMODIFIED/200 4084 GET http://archive.ubuntu.com/ubuntu/dists/precise/main/i18n/Index - DIRECT/91.189.92.200 text/plain
1379271537.791     91 172.17.0.17 TCP_REFRESH_UNMODIFIED/200 3300 GET http://archive.ubuntu.com/ubuntu/dists/precise/universe/i18n/Index - DIRECT/91.189.92.200 text/plain
1379271537.891     87 172.17.0.17 TCP_MISS/404 663 GET http://archive.ubuntu.com/ubuntu/dists/precise/main/i18n/Translation-en.xz - DIRECT/91.189.92.200 text/html
1379271537.936     44 172.17.0.17 TCP_MISS/404 667 GET http://archive.ubuntu.com/ubuntu/dists/precise/universe/i18n/Translation-en.xz - DIRECT/91.189.92.200 text/html
1379271538.091    156 172.17.0.17 TCP_REFRESH_UNMODIFIED/200 892981 GET http://archive.ubuntu.com/ubuntu/dists/precise/main/i18n/Translation-en.gz - DIRECT/91.189.92.200 application/x-gzip
1379271538.578    477 172.17.0.17 TCP_REFRESH_UNMODIFIED/200 4133274 GET http://archive.ubuntu.com/ubuntu/dists/precise/universe/i18n/Translation-en.gz - DIRECT/91.189.92.200 application/x-gzip
Update: Using sshfs to mount Docker container folders
Your Docker containers might not actually have any editors installed. One way to easily get around this is to just mount folders inside the Docker container using the user-mode SSHFS:
$ sshfs admin@localhost:/home/buildbot buildmaster/ -p 49199- ← Previous
Further Appification Of Full-Powered Computers - Next →
dockarchive