Peter and I have been updating the Tandem Exchange site translations over the past few weeks, and are now able to announce support for Arabic, Japanese, Korean, Simplified Chinese, and Traditional Chinese as first-class UI languages on the website in addition to the original German, Spanish, French, Italian, Portuguese, and Russian translations that we did first.
There was a moment on Monday when I let slip that the website was starting to take on the feel of a “real” website, and that is true. We now have 12 full translations of the website, which Google can grok for each of its region-specific search indices, and which we can serve to a wide swath of users around the world.
One of the weirder things about multiple-language support learned along the way, is the way the HTTP Accept-Language header formats a user’s UI language preference vs. the way GNU gettext specifies the same information vs. the way the Unicode Consortium specifies the same information vs. the way Facebook, Google, and Twitter specify the same information. And then how Django chooses to use that information when setting the site’s presentation language and looking up the correct gettext catalogs.
HTTP
The HTTP Accept-Language header usually looks something like: “Accept-Language:en-US,en;q=0.8” where the language codes are specified by a massive, long-winded standard called BCP47. The standard defines a language code to look something like en-US or zh-CN or zh-TW, but the standard doesn’t really bother giving a list of common language codes, leaving that instead to the combinatorial explosion that results by mixing together one entry from each of the categories of the IANA Subtag Registry.
Django
In the Django settings.py file, you specify the list of languages that the website is supposed to support, and you do this using language-code strings that look like this, where the first entry in the tuple looks roughly like BCP47:
LANGUAGES = (
    ('ar', 'العربية'),
    ('de', 'Deutsch'),
    ('en', 'English'),
    ('es', 'Español'),
    ('fr', 'Français'),
    ('it', 'italiano'),
    ('ja', '日本語'),
    ('ko', '한국어'),
    ('pt', 'português'),
    ('ru', 'ру́сский'),
    ('zh-cn', '简体中文'),
    ('zh-tw', '繁體中文'),
)
Note, however, that the language-code is strictly lowercase and uses a hyphen as a separator.
gettext
When building the translation catalogs for Django, you have to use gettext’s locale-naming format, which looks something like en_US or zh_CN.
So when you’re looking at your app’s locale/ subfolder, it will end up containing directories looking something like:
$ ls locale
ar  de  en  es  fr  it  ja  ko  pt  ru  zh_CN  zh_TW
Note the difference in the separator (hyphens vs. underscores) and the region code (lower vs. upper case). On a case-sensitive filesystem, you have to get this exactly right.
Unicode Consortium CLDR
But let’s say you’re also using the Unicode Consortium’s Common Locale Data Repository to generate some information instead of having to write it all out yourself? They use a slightly different set of language/region/locale identifiers, which are generally sensible but in the case of the Chinese languages, use zh_Hans and zh_Hant as parts of the filenames and language identifiers:
ee_TG.xml       fr_CF.xml        kw_GB.xml       sah_RU.xml       yo.xml
ee.xml          fr_CG.xml        kw.xml          sah.xml          zh_Hans_CN.xml
el_CY.xml       fr_CH.xml        ky_KG.xml       saq_KE.xml       zh_Hans_HK.xml
el_GR.xml       fr_CI.xml        ky.xml          saq.xml          zh_Hans_MO.xml
el.xml          fr_CM.xml        lag_TZ.xml      sbp_TZ.xml       zh_Hans_SG.xml
en_150.xml      fr_DJ.xml        lag.xml         sbp.xml          zh_Hans.xml
en_AG.xml       fr_DZ.xml        lg_UG.xml       se_FI.xml        zh_Hant_HK.xml
en_AS.xml       fr_FR.xml        lg.xml          seh_MZ.xml       zh_Hant_MO.xml
en_AU.xml       fr_GA.xml        ln_AO.xml       seh.xml          zh_Hant_TW.xml
en_BB.xml       fr_GF.xml        ln_CD.xml       se_NO.xml        zh_Hant.xml
en_BE.xml       fr_GN.xml        ln_CF.xml       ses_ML.xml       zh.xml
en_BM.xml       fr_GP.xml        ln_CG.xml       ses.xml          zh.xml~
en_BS.xml       fr_GQ.xml        ln.xml          se.xml           zu.xml
en_BW.xml       fr_HT.xml        lo_LA.xml       sg_CF.xml        zu_ZA.xml
en_BZ.xml       fr_KM.xml        lo.xml          sg.xml
Facebook passes back the locale of their users like so: ar_AR, zh_CN, zh_TW, and there’s a list of their supported languages and locales here. Of the bunch, they’re the most consistent, sticking to a [2-letter language code + 2-letter ISO country name] combo.
Google passes back the locale of their users like so: ar, zh-CN, zh-TW, and there’s a list of their supported languages and locales here. They mix and match pure 2-letter language codes with [2-letter language code + 2-letter ISO country name] and even [2-letter language code + 3-letter ISO region code] combos. Sigh.
Twitter generally passes back the locale of their users using 2-letter language codes such as ar, de, en, etc., but for Chinese they pass back zh-cn and zh-tw for Simplified and Traditional Chinese. Of course, this is pure speculation, because the most detailed available info about this comes by reading the source of their Tweet button generator.
So…
Needless to say, it all gets a bit confusing. But the point is this:
- In the Django settings.LANGUAGES list, strip down your language codes to 2-letters if possible, use all-lowercase, and hyphens to separate a [language code – region code] identifier, or Django will complain.
- On disk, make sure your translation files are in directories like locale/en, locale/zh_CN, and so on, with underscores and capital letter region codes where necessary.
- And if you’re ever using OAuth to authenticate your incoming users, make sure to process the locale information coming from Facebook, Google, or Twitter, into the lower-case, hyphen-separated form used by Django, before you write it into the user’s profile.
One Final Thing
It was definitely interesting to see what kind of changes to the styling and layout were necessary to support the Arabic language. One of the tricky things about making sure things style properly in right-to-left mode is the fact that CSS float: property and text-align: property do not take on opposite meanings when you set the text-direction in the body content.
So in our case, we had a panel that relied on floats to style properly.
In the left-to-right case, it looks like:
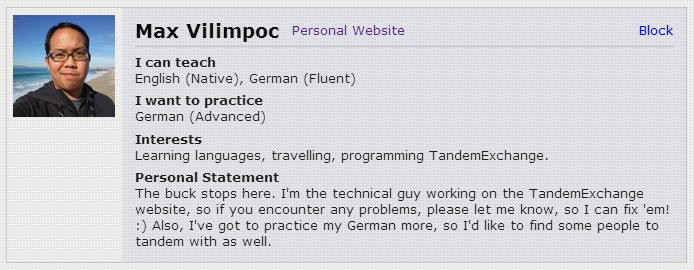
In the right-to-left case, it looks like:
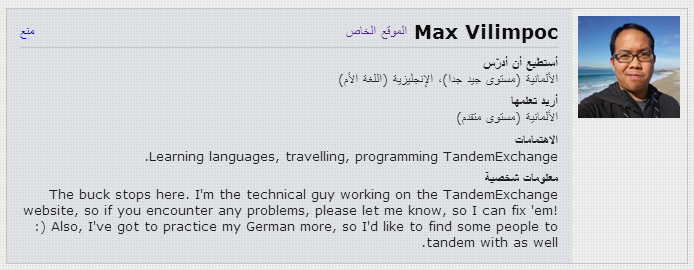
To get it to do this, we had to add a {% if LANGUAGE_BIDI %}rtl{% endif %} rule to each of the CSS classes that needed the explicit float: property change, then specify those styles like so:
|
1
2
3
4
5
6
7
8
9
|
.name {
float: left;
text-align: left;
}
.name.rtl {
float: right;
text-align: right;
}
|
And that’s it, for now.