Stateful vs. Stateless Browsing (Improving Your Privacy Online)

I’ve been thinking about how to reduce the trail of information I leave behind while surfing the web.

When the web was first invented, it was, by definition, a stateless place. There was no read/write web, PHP was still a glimmer in its inventors’ eyes, and dynamically-generated content was still the domain of those hardy Perl hackers who could stand writing code for ~/cgi-bin. Things were far less interactive. You browsed to websites, and those websites recorded some minimal information about you to their log files: your Internet Protocol address, what browser you were using (via the User Agent header), essentially just information that was part of the protocol.

In the mid-1990s, Bell Labs and Netscape introduced the cookie specification for the purpose of enabling web commerce, with the unintended consequence of transforming the entire web into a highly stateful place. (Ok, the RFC states the reverse, but we all know what really happened.) Now all of your previous interactions with a website could be in some way encoded, preserved, and recalled via the magic of a browser cookie, even by unintended websites that you may just have brushed up against like so much poison ivy. The ease with which third parties have been tracking our online behaviors, of course, has never been the same.

To reduce one’s web footprint, common tricks were applied: Using Ad- and Flash-blocker plugins in Google Chrome or Mozilla Firefox was one, using an /etc/hosts file was another.

These were things I’d already tried. But with the newer versions of Chrome, I’d begun to use multiple user profiles to specifically separate the profiles that I presented to online services. I had a profile for Facebook, a profile for Google Docs and Analytics, one for my web development work, and so on. The user credentials, cookies, and tracking data in each profile were kept entirely separate from one another, perhaps giving some websites the impression that I was several different people. It was all a bit tedious and, actually, sub-optimal.

I realized:

The more natural usage-pattern split is between stateful and stateless browsing habits.

In other words:

  • If I must be logged in to interact meaningfully with a website, to ensure that it knows who I am or to maintain a shopping cart full of goods, that’s a stateful transaction.
  • If I don’t need to be logged in to receive information from a website, because it doesn’t need to care about who I am or keep track of an order I’ve placed, that’s a stateless transaction.

Examples:

Stateful browsing (example) Stateless browsing
Webmail (Gmail) Plain old web browsing, even using Google Search, can be a stateless affair.

No more ads showing up on partnering display networks immediately after you've googled something!

Any kind of browsing where your actions on a webserver are read-only can be stateless.
Social Networks (Facebook)
Shopping (Amazon, eBay)
Source repositories (github)
Bugtracking Services (Redmine)

There are a handful of websites I use regularly that need cookies to function properly: Tandem Exchange, the issue tracking system for Tandem Exchange, Google AdWords, Google Analytics, Google Docs, Facebook, Twitter, Odnoklassniki, VKontakte, and a range of other social networks I use to test social login capabilities. These sites have a legitimate need for cookies, since without them, I can’t prove my identity and access rights.

For everything else, I go stateless.

It turns out, actually, that you can turn cookies off completely for any kind of web browsing where you’re just reading something or looking something up. Unless it’s behind a paywall, or some other access control mechanism, plain web surfing does not require cookies, and may even be better that way (since the website can’t suggest more crap for you to look at, based upon the things it thinks you like). All of your requests must be interpreted as neutral requests. The sort of tuning, customization, filtering, and presentation of the web to your exact preferences and prejudices, can not happen, since each request has to be treated impartially.

So that’s what I’ve done. I’ve created one user profile, in which all the cookies and nasty bits of tracking can occur; and I’ve created a second user profile, in which I accept absolutely none of it. Another way to think about it is that I have a profile that I explicitly allow everyone to know everything about, and I have a profile that no one knows anything about. Whenever I’m required to log into a web service, I use the first profile. Whenever I just want to look something up and browse anonymously (which is 99% of the time), I use the second profile.

Keep in mind, also, that Incognito Mode on Chrome still accepts cookies from all sources. So you may think you’re not being followed around, but you still will be.

Settings (in Chrome)

Create two user profiles via the Settings page:

Guess which one is which?

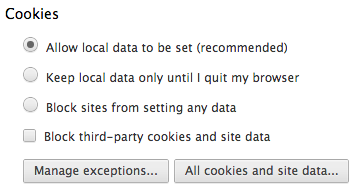
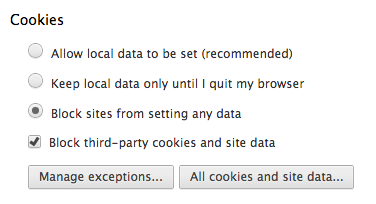
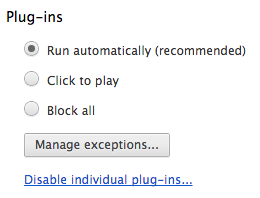
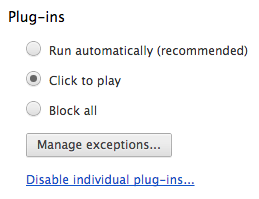
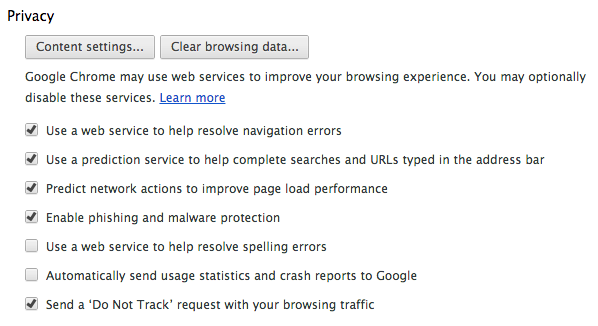
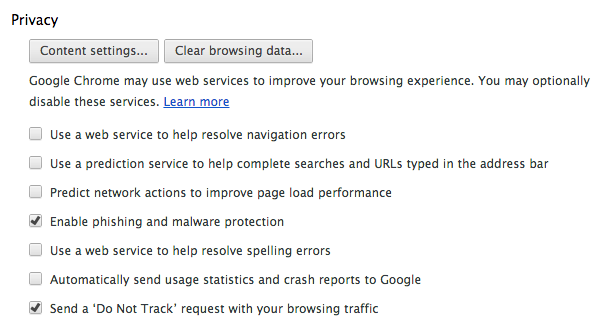
Then just set the profile settings as follows, and use the profiles as appropriate.

Stateful Stateless
doofus-cookies ninja-cookies
plugins-stateful plugin-stateless
privacy-settings-stateful privacy-settings-stateless

libevent, gcov, lcov, and OS X

Getting a sense of code coverage for open-source projects is necessary due-diligence for any dependent project. On OS X, it’s also a little more work. While doing some of my own research, I wanted to see how well tested the libevent library was, but wasn’t finding much info online. So here’s a log of what I needed to do, to get this information on a Mac.

First things first (and this should apply for many more open-source projects), after I checked out the latest code from github, I added an option to the configure.ac Autoconf source file to insert the necessary profiling code calls for code coverage:

With that added, I reran the autogen.sh file, which pulls in the configure.ac file, and regenerates the configure script, and then I ran ./configure --enable-coverage.

Then I ran make and specified clang as the C compiler instead of old-school gcc. Besides better code quality and error reports, only clang will generate the coverage code. The Apple version of gcc did not do so, leading to some initial confusion.

Once the build was complete, I ran the regression tests with:

Unfortunately, the following error occurred:

So I tried running tests/regress directly and saw:

Oops.

Turns out that Apple uses the profile_rt library to handle code coverage instead of the former gcov library, which is why the _llvm_gcda_start_file function symbol is missing. So I linked to the libprofile_rt.dylib library by specifying LDFLAGS=-lprofile_rt on the make command line:

Rerunning make verify, the following was output, which indicated which of the event notification subsystems were available and being tested on the system:

Once the regression tests finished, the coverage data became available in the form of *.gcno and *.gcda files in the test/ folder and in the .libs/ folder.

Running lcov generated easier-to-interpret HTML files:

Once lcov finished, all I had to do was open up html/index.html and see how much code the coverage tests executed. (And panic? In this case, 14.5% coverage seems pretty low!)

Here’s what the lcov summary looks like:

lcov-libevent

I reran the test/regress command to see if that would help, and it did push the coverage rate to 20%, but I need more insight into how the coverage tests are laid out, to see what else I can do. It is not clear how well the coverage tools work on multiplatform libraries like libevent, which have configurably-included backend code that may or may not run on the platform under test. In these cases, entire sections of code can be safely ignored. But it is unclear that code coverage tools in general are going to be aware of the preprocessor conditions that were used to build a piece of software (nor would I trust most coverage tools to be able to apply those rules to a piece of source code, especially if that code is written in C++).

In any case, like I said in a previous entry, coverage ultimately is not proof of correct behavior, but it is a good start to see what parts of your code may need more attention for quality assurance tests.

Detailed Error Emails For Django In Production Mode

Sometimes when you’re trying to figure out an issue in a Django production environment, the default exception tracebacks just don’t cut it. There’s not enough scope information for you to figure out what parameters or variable values caused something to go wrong, or even for whom it went wrong.

It’s frustrating as a developer, because you have to infer what went wrong from a near-empty stacktrace.

In order to be able to produce more detailed error reports for Django when running on the production server, I did a bit of searching and found a few examples like this one, but rewriting a piece of core functionality seemed a bit weird to me. If the underlying function changes significantly, the rewrite won’t be able to keep up.

So I came up with something different, a mixin function redirection that adds the extra step I want (emailing me a detailed report) and then calls the original handler to perform the default behavior:

Note that by using this code, you do end up with two emails: the usual generic error report and the highly-detailed one containing details usually seen when you hit an error while developing the site with settings.DEBUG == True. These emails will be sent within milliseconds of one another. The ultimate benefit is that none of the original code of the Django base classes is touched, which I think is good idea.

Another thing to keep in mind is that you probably want to put all of your OAuth secrets and deployment-specific values in a file other than settings.py, because the values in settings get spilled into the detailed report that is emailed.

One final note is that I am continuously amazed by Python. The fact that first-class functions and dynamic attributes let you hack functionality in, in ways the original software designers didn’t foresee, is fantastic. It really lets you get around problems that would require more tedious solutions in other languages.

Python Parametrized Unit Tests

I’ve been testing some image downloading code on Tandem Exchange, trying to make sure that we properly download a profile image for new users when they sign in using one of our social network logins. As I was writing my unit tests, I found myself doing a bit of copy and paste between the class definitions, because I wanted multiple test cases to check the same behaviors with different inputs. Taking this as a sure sign that I was doing something inefficiently, I started looking for ways to parametrize the test cases.

Google pointed me towards one way to do it, though it seemed a bit more work than necessary and involved some fiddling with classes at runtime. Python supports this, of course, but it seemed a bit messy.

The simpler way, which doesn’t offer quite as much flexibility but offers less complexity (and less fiddling with the class at runtime), was to use Python’s mixin facility to compose unit test classes with the instance parameters I wanted.

So let’s say I expect the same conditions to hold true after I download and process any type of image:

  1. I want the processed image to be stored somewhere on disk.
  2. I want the processed image to be converted to JPEG format, in truecolor mode, and scaled to 256 x 256 pixels.
  3. I want to retrieve the processed image from the web address where I’ve published it, and make sure it is identical to the image data I’ve stored on disk (round trip test).

Here’s what that code might look like:

So what ends up happening is that the composed classes simply specify which image they want the test functions to run against, and the rest of the test functions run as usual against that input parameter.

One thing readers might notice is the seemingly backwards class inheritance. Turns out (you learn something everyday!) Python thinks about class inheritance declarations from right-to-left, meaning that in the above examples, unittest.TestCase is the root of the inheritance chain. Or another way to look at it is that, for example, GoodAvatar instances will first search in StandardTestsMixin then in unittest.TestCase for inherited methods.

Google Spreadsheet Geocoding Macro

I’ve been doing a bit of nerding around with a side project, which involves editing a bunch of addresses in Google Sheets and having to geocode them into raw lat/lng coordinate pairs.

google-sheets-geocode-macro

I went ahead and coded up a quick App Script macro for Google Sheets that lets you select a 3-column wide swath of the spreadsheet and geocode a text address into coordinates.

Update 10 January 2016:

The opposite is now true too, you can take latitude, longitude pairs and reverse-geocode them to the nearest known address. Make sure you use the same column order as in the above image: it should always be Location, Latitude, Longitude.

I’ve moved the source to Github here:
https://github.com/nuket/google-sheets-geocoding-macro

It’s pretty easy to add to your Google Sheets, via the Tools -> Script Editor. Copy and paste the code into the editor, then save and reload your sheet, and a new “Geocode” menu should appear after the reload.

Update 15 March 2021:

I’ve added code to allow for reverse geocoding from latitude, longitude pairs to the individual address components (street number, street, neighborhood, city, county, state, country).