Shrinkr: Using SCons To Transcode Media

tl;dr

Shrinkr lets you convert a folder’s worth of audio or video files by running a simple command on a build script:

scons -f ShrinkrTranscode -k

In other words, it’s a command-line batch transcoder with rework avoidance.

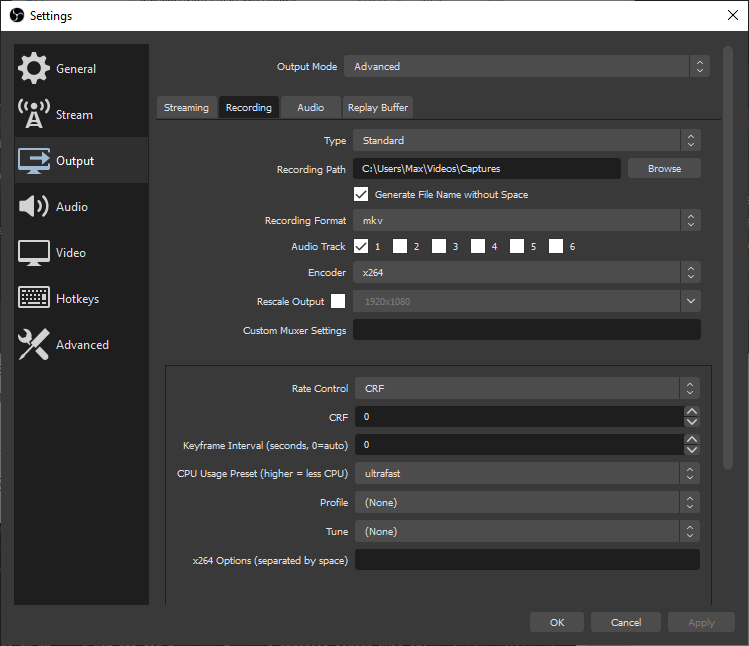
By default it’s set up to convert any .mp4 or .mkv files it finds in current directory and rescale them to Full HD resolution using ffmpeg.

You can edit the ShrinkrTranscode file to change parameters and selected input files, everything is under your control, since it is essentially a Python script with SCons’ declarative build extensions on top.

tl;dw

Here’s a 2-minute video summarizing how Shrinkr works.

Setting It Up

You need to have the Python, SCons, and FFmpeg executables installed and discoverable via your system or user PATH environment variable.

Then, simply grab a copy of the ShrinkrTranscode file, put it in the folder with the files you want to transcode, and run it as above.

The Repository

All of the development files are located at https://github.com/nuket/Shrinkr.

The Long Version

A while back, before I was even starting to heavily use Shotcut for non-linear video editing, I wanted a way to automatically generate proxy editing files from original video files.

None of my computers have the hardware decoders necessary for HEVC video and I needed to resample the video down to a more manageable resolution.

So I wrote the original version of Shrinkr as a Python script that could take a JSON configuration file and convert an input video file into any number of output profiles (UtVideo, Huffyuv, and so on). I was basically reinventing the wheel, though.

I didn’t really ever use the original Shrinkr, as it would require also swapping the proxy files with those that the editing software would be using. This would require parsing in an XML project file, figuring out where all of the filenames were located in the object tree, rewriting them, and then writing that whole thing out.

Also, I had other things I wanted to work on. So I shelved it.

Fast forward several months: As of its 20.06.28 release, Shotcut has an integrated proxy editing workflow, which makes proxy file generation superfluous. This saves a ton of effort on the user’s part.

But what about regular transcoding? What options are available for batch transcoding there?

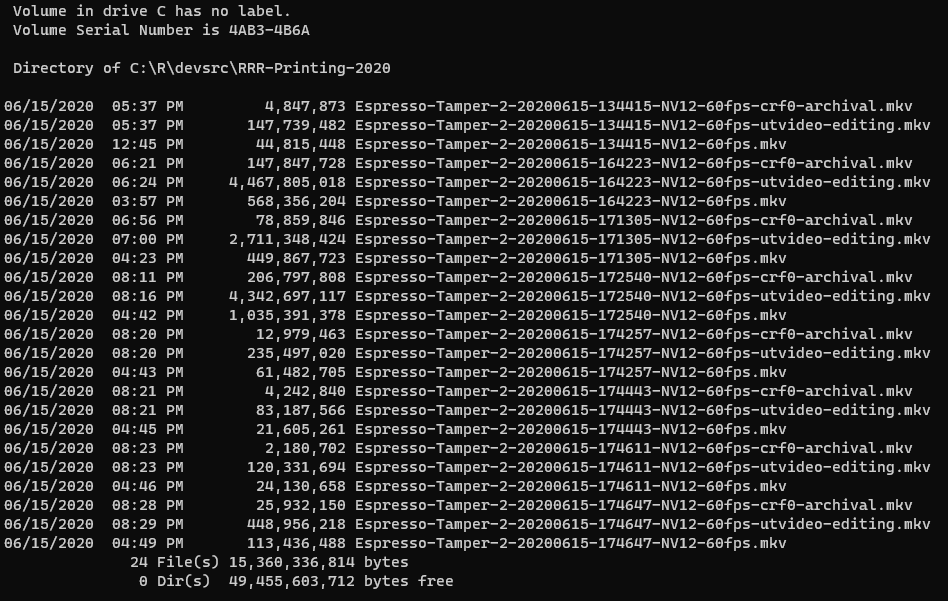
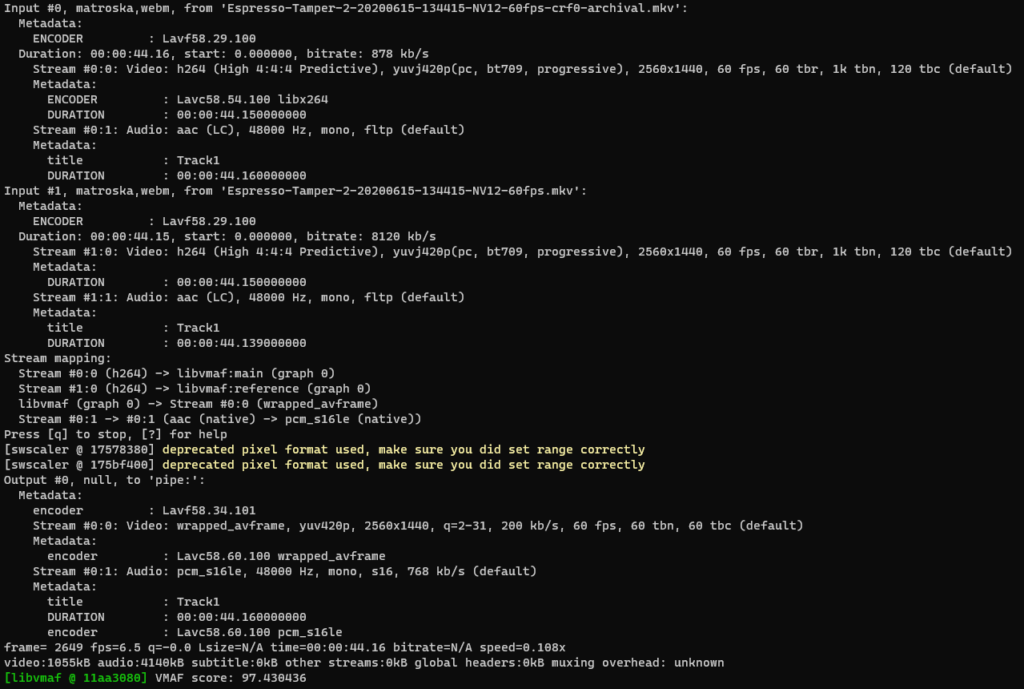
I had been archiving a number of screencast files recorded using Open Broadcast Software. These were recorded using ffmpeg‘s lossless x264 with whatever high bitrate it needed, but post processing the files for archival would often reduce the storage required by 66 – 75%.

So I wrote a new version of Shrinkr that essentially leverages the SCons build system to track which files need processing.

It is basically a build script, configurable however it is needed, using all of the power of the Python language.

This saves a ton of code, and gets right to the point:

Transcoding media files is conceptually identical to compiling software, so using a real build system makes sense.

Hope this helps anyone out there looking for a simple way to get their bulk transcoding done.

Archiving Screencast Videos

Because my computer is a bit old (Ivy Bridge i7-3770), it can only do 1440p screen capture at 60fps when using the -preset ultrafast setting in OBS Studio.

For a processor built in 2012, this is actually pretty good.

When I’m doing a screencast, I want the bulk of the CPU cycles to go towards the program running, not the video encoding. I don’t have a discrete graphics card, and I’m using a small form factor desktop anyways, so my options are limited and price / performance will suck with a 75 watt single-slot PCIe power budget.

Later, I go through and transcode the files into archival format. The above command tells the encoder (by default, libx264) to use a Constant Rate Factor of 0 (lossless) and -preset veryslow to squeeze as much data out of the file as possible, trading CPU time and computational complexity for storage.

For example, here’s a list of files and sizes associated with an archival codec and an editing codec.

You can see that the archival format can be ~4x – 10x smaller than the original files, particularly in cases where there isn’t a lot of motion, or large amounts of low-entropy data (i.e. screencasts where the background is a solid color).

If I later want to use the video as source material in my editor, I transcode it back to a low-res, low-complexity proxy file. I’d want to do that anyway since my computer would otherwise become a hiccuping mess when applying filters to 1440p or 2160p source videos.

Both sets of files above were created using Shrinkr, but in the future I will use an SCons build file to generate the archival files.

The general command is:

ffmpeg -benchmark -i input.mkv -crf 0 -preset veryslow -c:a copy -color_primaries bt709 -color_trc bt709 -colorspace bt709 output.mkv

Funnily enough, even though it’s considered lossless, when I run the files through the Netflix VMAF test, it will not identify them as identical. But they should be computationally the same and visually indistinguishable (both using -crf 0, at a fraction of the space.

VMAF score: 97.430436 for two files

The writer of the seminal streaming codec shootout “NVENC comparison to x264 x265 QuickSync VP9 and AV1 (unrealaussies.com)” makes the good point that VMAF is a bit fuzzy and will return less than a 100% match for identical files. But that this matches the fact that a real human probably wouldn’t be able to see this visually either.

I’m still getting up to speed on video editing, but already learning some of the tricks that help make it an enjoyable experience.

Noisefloor Firmware

A couple of weeks ago, I started working on another of my infinite small projects.

This time, I needed a tool that could show me what was going on with another piece of firmware I was working on that was transmitting data regularly in the unlicensed 2.4 GHz frequency band.

The problem is this: I have multiple transmitters using the same frequency to send data to a single receiver. When the data rate starts to creep upward and the interval between transmissions decreases, you start getting serious resource contention.

It’s a classic multi-user situation, which is solved in other wired and wireless standards using things like Carrier Sense Multiple Access / Collision Detection (CSMA/CD). (In Ethernet or Wi-Fi, example.)

I don’t have access to the specialized off-the-shelf tooling needed to monitor the radio spectrum (it’s pretty expensive). So I decided to build my own, very limited, very specific tool.

That tool is Noisefloor, a small tool to help me visualize and debug a Time Division Multiple Access multiplex scheme by sampling the TDMA timeslot and plotting out when the various nodes are transmitting.

It runs on Nordic Semiconductor nRF5 Series chips using a single firmware executable.

Specifically: the nRF51422, nRF52832, and nRF52840.

That’s right, there’s a single binary file to load, compiled to the ARM v6-M specification, that runs on the off-the-shelf nRF51-DK, nRF52-DK, and nRF52840 Dongle development boards.

Part of the fun of developing this firmware was figuring out how to do write-once, run-anywhere code that dynamically adapts to the underlying microcontroller.

Anyways, thus far, I’ve pushed three posts out on the topic, and am documenting it as I go, including Requirements and Architecture specs. The code is almost feature-complete, and I’ll be slowly writing that up, too.

For more info, please check out the project. Any feedback or questions would be welcome.