Genius-Level Software Developers

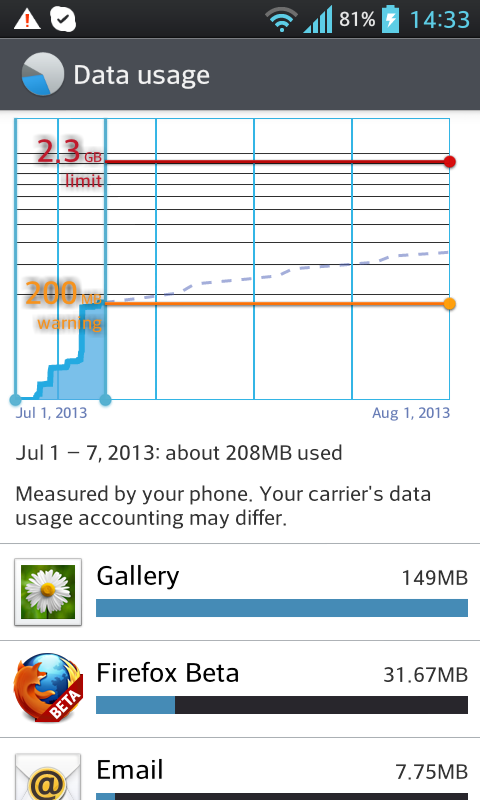
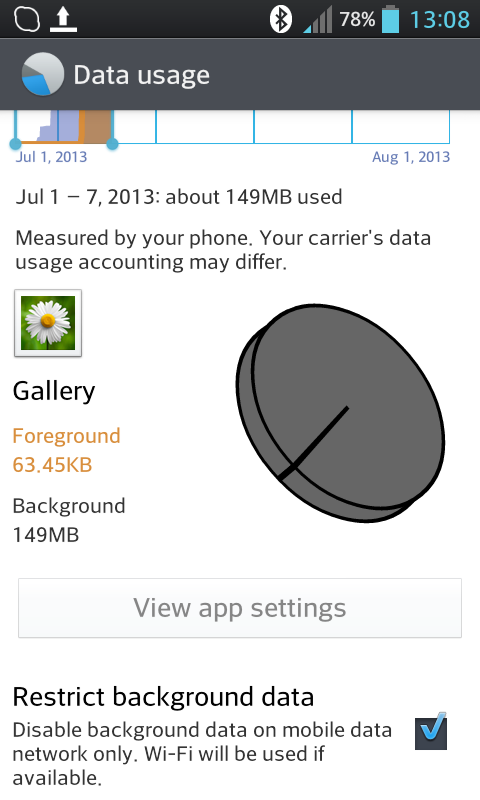
Unfortunately, there aren’t more of them around. For anyone who has ever wondered why their data plan gets chewed up so quickly, look no further than the idiots who program smartphone apps that force you to opt-out of 3G / 4G data synchronization over the phone networks:

gallery-idiots

Because I really wanted my multi-year-old photos from Picasa, which I’m about to delete, to sync down onto my phone over HSPA. Thanks guys. I really like it when a program punishes me for its bad behavior. Of the top-three data consumers on my phone, the top two had better just be email and web, because that is the stuff I actually care about and need immediate, high-speed access to. Also: Why do I want to sync these photos anyway? Isn’t that what the cloud is for? So I don’t have to lug around a full-sized (!) local copy, if I don’t want?

opt-out

So they’re smart enough to know that I might mind, but not smart enough to explicitly ask me whether or not I want to burn up my high-speed data quota first.

Django Testing: Creating And Removing Test Users

During the development of Tandem Exchange, I wanted to write some test routines to check the validity of the core search functions that figure out which of the users would be good matches for one another as language tandem partners.

There are a number of ways to do this, Django’s built-in unit test infrastructure is a bit limited in that it attempts to create and drop a new database each time, to let the test have an independent and clean database in which to work. But this isn’t something that’s possible with most shared webhosters, for obvious reasons, so the Django unit test infrastructure is less than useful in these cases.

But you don’t really need to create/drop databases all the time. In my case, the schema stays the same throughout, all I want to do is add and remove users on the non-production database and check that the search functions work.

Here’s how I am planning to do it, via the unittest.TestCase setUp() and tearDown() methods:

Then all you need to do for any particular unit test is to remove those users created in the duration. This isn’t something you can use in a production database, since there will be a natural race condition between the setUp() and tearDown() calls. But this should work just fine in a non-production environment, where no one’s signing up while you’re running tests.

Update: Here’s what the unittest.TestCase code looked like, in the end. Note that you must evaluate the QuerySet expression immediately in setUp() and tearDown() as failure to do so causes them to both be lazily-evaluated at the users_to_remove assignment, which gives you an empty set.

A Lack Of Negative Reinforcement

When I was growing up, my parents taught me that if you couldn’t say something nice, you shouldn’t say anything at all. When I grew up, I figured out that that was bullshit, but I still tend to hold the line.

Google, Facebook, and others don’t seem to understand that the lack of a negative reinforcement signal does not help to generate results that users want.

I’m tired, namely, of this appearing in various, completely unrelated search results on YouTube:

The Ultimate Girls Fail Compilation 2012

How about a “never show me this again” option? Or an Unlike button. Without Unlike, all of the possible Likes in the universe are biased in such a way that you have only two choices, with the first being a conflated form of “I dislike it and would gladly never see it again / I am ambivalent about it and couldn’t care less” and the second being “Like”.

On YouTube, I believe you can downvote a video, after you’ve clicked on it, which seems kind of stupid, since it gives the uploader the view they so desperately want. There should be an option to remove items you find stupid when you’re hovering over suggestions, and that ought to count in some way against them.

I suppose the only saving grace is that it’s a good thing that the social network operators of the world only know my Likes, but not yet my Dislikes. The higher their signal to noise ratio gets, the creepier the online experience becomes.

Locale Fun

Peter and I have been updating the Tandem Exchange site translations over the past few weeks, and are now able to announce support for Arabic, Japanese, Korean, Simplified Chinese, and Traditional Chinese as first-class UI languages on the website in addition to the original German, Spanish, French, Italian, Portuguese, and Russian translations that we did first.

There was a moment on Monday when I let slip that the website was starting to take on the feel of a “real” website, and that is true. We now have 12 full translations of the website, which Google can grok for each of its region-specific search indices, and which we can serve to a wide swath of users around the world.

One of the weirder things about multiple-language support learned along the way, is the way the HTTP Accept-Language header formats a user’s UI language preference vs. the way GNU gettext specifies the same information vs. the way the Unicode Consortium specifies the same information vs. the way Facebook, Google, and Twitter specify the same information. And then how Django chooses to use that information when setting the site’s presentation language and looking up the correct gettext catalogs.

HTTP

The HTTP Accept-Language header usually looks something like: “Accept-Language:en-US,en;q=0.8” where the language codes are specified by a massive, long-winded standard called BCP47. The standard defines a language code to look something like en-US or zh-CN or zh-TW, but the standard doesn’t really bother giving a list of common language codes, leaving that instead to the combinatorial explosion that results by mixing together one entry from each of the categories of the IANA Subtag Registry.

Django

In the Django settings.py file, you specify the list of languages that the website is supposed to support, and you do this using language-code strings that look like this, where the first entry in the tuple looks roughly like BCP47:

LANGUAGES = (
    ('ar', 'العربية'),
    ('de', 'Deutsch'),
    ('en', 'English'),
    ('es', 'Español'),
    ('fr', 'Français'),
    ('it', 'italiano'),
    ('ja', '日本語'),
    ('ko', '한국어'),
    ('pt', 'português'),
    ('ru', 'ру́сский'),
    ('zh-cn', '简体中文'),
    ('zh-tw', '繁體中文'),
)

Note, however, that the language-code is strictly lowercase and uses a hyphen as a separator.

gettext

When building the translation catalogs for Django, you have to use gettext’s locale-naming format, which looks something like en_US or zh_CN.

So when you’re looking at your app’s locale/ subfolder, it will end up containing directories looking something like:

$ ls locale
ar  de  en  es  fr  it  ja  ko  pt  ru  zh_CN  zh_TW

Note the difference in the separator (hyphens vs. underscores) and the region code (lower vs. upper case). On a case-sensitive filesystem, you have to get this exactly right.

Unicode Consortium CLDR

But let’s say you’re also using the Unicode Consortium’s Common Locale Data Repository to generate some information instead of having to write it all out yourself? They use a slightly different set of language/region/locale identifiers, which are generally sensible but in the case of the Chinese languages, use zh_Hans and zh_Hant as parts of the filenames and language identifiers:

ee_TG.xml       fr_CF.xml        kw_GB.xml       sah_RU.xml       yo.xml
ee.xml          fr_CG.xml        kw.xml          sah.xml          zh_Hans_CN.xml
el_CY.xml       fr_CH.xml        ky_KG.xml       saq_KE.xml       zh_Hans_HK.xml
el_GR.xml       fr_CI.xml        ky.xml          saq.xml          zh_Hans_MO.xml
el.xml          fr_CM.xml        lag_TZ.xml      sbp_TZ.xml       zh_Hans_SG.xml
en_150.xml      fr_DJ.xml        lag.xml         sbp.xml          zh_Hans.xml
en_AG.xml       fr_DZ.xml        lg_UG.xml       se_FI.xml        zh_Hant_HK.xml
en_AS.xml       fr_FR.xml        lg.xml          seh_MZ.xml       zh_Hant_MO.xml
en_AU.xml       fr_GA.xml        ln_AO.xml       seh.xml          zh_Hant_TW.xml
en_BB.xml       fr_GF.xml        ln_CD.xml       se_NO.xml        zh_Hant.xml
en_BE.xml       fr_GN.xml        ln_CF.xml       ses_ML.xml       zh.xml
en_BM.xml       fr_GP.xml        ln_CG.xml       ses.xml          zh.xml~
en_BS.xml       fr_GQ.xml        ln.xml          se.xml           zu.xml
en_BW.xml       fr_HT.xml        lo_LA.xml       sg_CF.xml        zu_ZA.xml
en_BZ.xml       fr_KM.xml        lo.xml          sg.xml

Facebook

Facebook passes back the locale of their users like so: ar_AR, zh_CN, zh_TW, and there’s a list of their supported languages and locales here. Of the bunch, they’re the most consistent, sticking to a [2-letter language code + 2-letter ISO country name] combo.

Google

Google passes back the locale of their users like so: ar, zh-CN, zh-TW, and there’s a list of their supported languages and locales here. They mix and match pure 2-letter language codes with [2-letter language code + 2-letter ISO country name] and even [2-letter language code + 3-letter ISO region code] combos. Sigh.

Twitter

Twitter generally passes back the locale of their users using 2-letter language codes such as ar, de, en, etc., but for Chinese they pass back zh-cn and zh-tw for Simplified and Traditional Chinese. Of course, this is pure speculation, because the most detailed available info about this comes by reading the source of their Tweet button generator.

So…

Needless to say, it all gets a bit confusing. But the point is this:

  1. In the Django settings.LANGUAGES list, strip down your language codes to 2-letters if possible, use all-lowercase, and hyphens to separate a [language code – region code] identifier, or Django will complain.
  2. On disk, make sure your translation files are in directories like locale/en, locale/zh_CN, and so on, with underscores and capital letter region codes where necessary.
  3. And if you’re ever using OAuth to authenticate your incoming users, make sure to process the locale information coming from Facebook, Google, or Twitter, into the lower-case, hyphen-separated form used by Django, before you write it into the user’s profile.

One Final Thing

It was definitely interesting to see what kind of changes to the styling and layout were necessary to support the Arabic language. One of the tricky things about making sure things style properly in right-to-left mode is the fact that CSS float: property and text-align: property do not take on opposite meanings when you set the text-direction in the body content.

So in our case, we had a panel that relied on floats to style properly.

In the left-to-right case, it looks like:
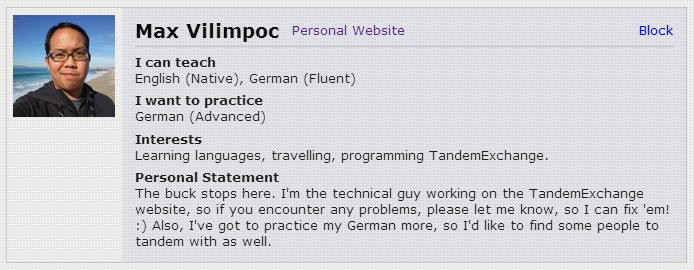
ltr-panel

In the right-to-left case, it looks like:
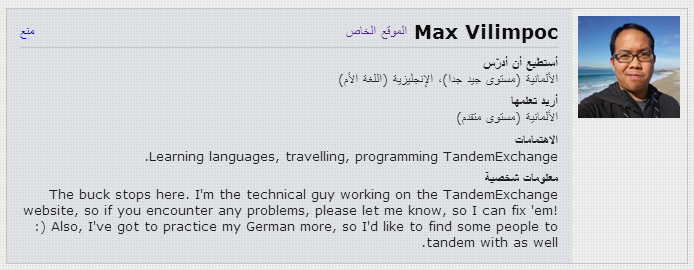
rtl-panel

To get it to do this, we had to add a {% if LANGUAGE_BIDI %}rtl{% endif %} rule to each of the CSS classes that needed the explicit float: property change, then specify those styles like so:

And that’s it, for now.

Using Google Protocol Buffers With qmake

Adapted from here:
http://www.kieltech.de/uweswiki/Google%20Protocol%20Buffers

(Original copied here for posterity)

The issue I have with this project include and extra compiler definition is that it places the generated protocol buffer classes in the build directory, which is not what I wanted.

So I modified the Protobuf.pri file to place the generated .pb.h and pb.cc output files back in the directory containing the .proto file, meaning I can use them more directly from other classes in that directory. I’m using a pretty flat directory hierarchy, though, so your mileage may vary. The nice thing also about the modified script is that you can refer to it from any subproject in a multi-project .pro file, and the relative paths should resolve automatically, with the generated files always finding their way home.

The various QMAKE_FILE_BASE, QMAKE_FILE_IN_PATH, and QMAKE_FILE_NAME variables are all undocumented, but I found some references to them here and here. Unfortunately, the official qmake reference leaves a lot to be desired, to the perpetual consternation of ambitious programmers.

Now, once you’ve added some protocol buffer .proto to your project, you’ll have to build the protoc compiler (on Linux or OS X anyway). After building the protoc protobuf compiler on Mac, you might have to copy the protoc executable to a directory in Qt Creator’s build environment PATH, which looks something like this:

/Users/someuser/Qt5.0.2/5.0.2/clang_64/bin:/usr/bin:/bin:/usr/sbin:/sbin

Unfortunately, by default, Qt Creator doesn’t include /usr/local/bin in its build environment PATH. And attempting to extend the PATH by doing $PATH:/usr/local/bin did not work for me.

So I copied my protoc to /usr/bin. You might be able to extend the PATH somehow to include /usr/local/bin, but I also wasn’t sure if this setting would carry over to other build environments (e.g. Windows or Linux), so I opted to just make protoc globally available and will probably do this in the other build environments as well.

Once you have the Protobuf.pri in place and included, and have added a PROTOS declaration to your .pro file, the build should now have a line where protoc is being run:

Note that the .variable_out settings in the qmake extra compiler definitions above mean that you don’t ever have to add the generated .pb.cc and .pb.h files to the project containing the .proto file. They are automatically added to the SOURCES and HEADERS variables when the protoc compile process runs. And they are automatically set to be cleaned when you do a project rebuild. If you do add the .pb.cc and .pb.h files to your .pro file, you’ll get duplicate make rules, and a warning that one of the make rules was ignored. Since you’re probably not going to edit the generated files anyway, it doesn’t matter much that they won’t be visible in the Qt Creator project file tree.

Don’t forget to link to the protobuf library!